Painting a swimming pool with epoxy starts with a compatible, sound surface and a safe plan for empty pool access. Preparation, component mixing, coat thickness, and curing all need to follow the selected product. There is no universal epoxy recipe or refill date.
This workflow is for a coating already confirmed suitable for the pool. If the substrate or old paint is unknown, begin with pool paint selection. Do not use a new coat to hide loose material or an unexplained crack.
Resolve water handling before the painting schedule
Have the installer or a qualified pool professional assess draining, groundwater, structural support, and safe access. Improper draining can damage a pool or liner. A paint label cannot establish whether your pool can safely remain empty.
Plan permitted water disposal and a way to keep people out of the work area. Review the coating’s safety data sheet for ventilation, ignition control, protective equipment, and handling. Solvent fumes in a pool require a suitable work plan, not just the assumption that outdoors means ventilated.
Create a product specific job sheet
Record the exact coating, component names, lot numbers, and current instructions. Separate preparation drying, induction, pot life, recoating, and immersion cure. They are different clocks.
| Timing term | What it controls |
|---|---|
| Preparation drying | When the cleaned substrate is ready for coating |
| Induction time | Any required wait after components are mixed |
| Pot life | How long the mixed product remains usable under specified conditions |
| Recoat window | When another coat can bond using the stated preparation |
| Immersion cure | When the completed film may contact pool water |
A film that feels dry can still be unready for another coat or for filling. Likewise, usable looking paint may have exceeded its pot life. Use recorded times and conditions rather than appearance alone.
Prepare the actual surface
Confirm that the base is sound and permitted repairs have cured. Remove failed material, contamination, and residual chalk using the coating’s specified process. Abrasion and cleaning requirements depend on the substrate and previous coating.
Do not copy a bare concrete etching procedure onto an already painted surface. Do not use an unapproved cleaner that leaves residue. If preparation reveals loose underlying material, pause for the appropriate repair assessment.
Use the specified moisture test after cleaning and drying. Test representative locations, including less favorable areas. A sunny wall looking dry does not prove the floor meets the same condition.
Check the whole weather window
Record air and surface conditions before applying each coat. Compare them with the product’s limits and the forecast through curing. Overnight cold, humidity, condensation, and rain can affect the work even after application stops.
The manufacturers’ drying and curing instructions differ. For example, INSL-X’s cited guide requires its own drying period after cleaning and a separate cure after the final coat. Do not substitute Ramuc’s schedule or another epoxy’s pot life.
Example job sheet: INSL-X epoxy
The cited INSL-X guide gives the following timing references. They belong together as one product example, not a schedule for Ramuc or another epoxy.
| Stage | Reference in the INSL-X guide |
|---|---|
| After cleaning | At least seven days drying; confirm the substrate is moisture free |
| Mixed paint at 77°F | 30 minute induction and six hour pot life |
| Bare masonry between coats | 12 to 24 hours after the first coat |
| After final coat, outdoors | At least seven days before filling |
| After final coat, indoors | At least 14 days with the specified forced ventilation |
The guide warns that dampness, rain, and excessive humidity delay curing. Its preferred application temperature is 65°F to 85°F. Meeting a calendar minimum does not override unsuitable conditions or the moisture test.
Include the coating’s safety requirements when arranging ventilation; ordinary equipment is not automatically suitable around solvent vapors. Record actual conditions and ask technical support about interruptions. Do not reset the schedule by guesswork after rain.
Pool paint coverage and quantity planner
Calculate the area being painted, including walls and steps, rather than using water volume or the pool’s footprint alone. For a simple flat rectangular interior, add floor area to perimeter multiplied by wall height. Slopes, curved walls, benches, and steps need their own measured areas.
For each coat, divide area by that coat’s applicable coverage rate. Add the resulting mixed quantities, then divide by the mixed yield per kit and round up. Keep square feet with coverage per square foot, or square meters with matching metric coverage.
Calculated example: suppose a measured interior totals 900 square feet. At hypothetical rates of 180 square feet per gallon for the first coat and 360 for the second, the coats need 5 and 2.5 gallons. Total mixed coating is 7.5 gallons before any justified allowance.
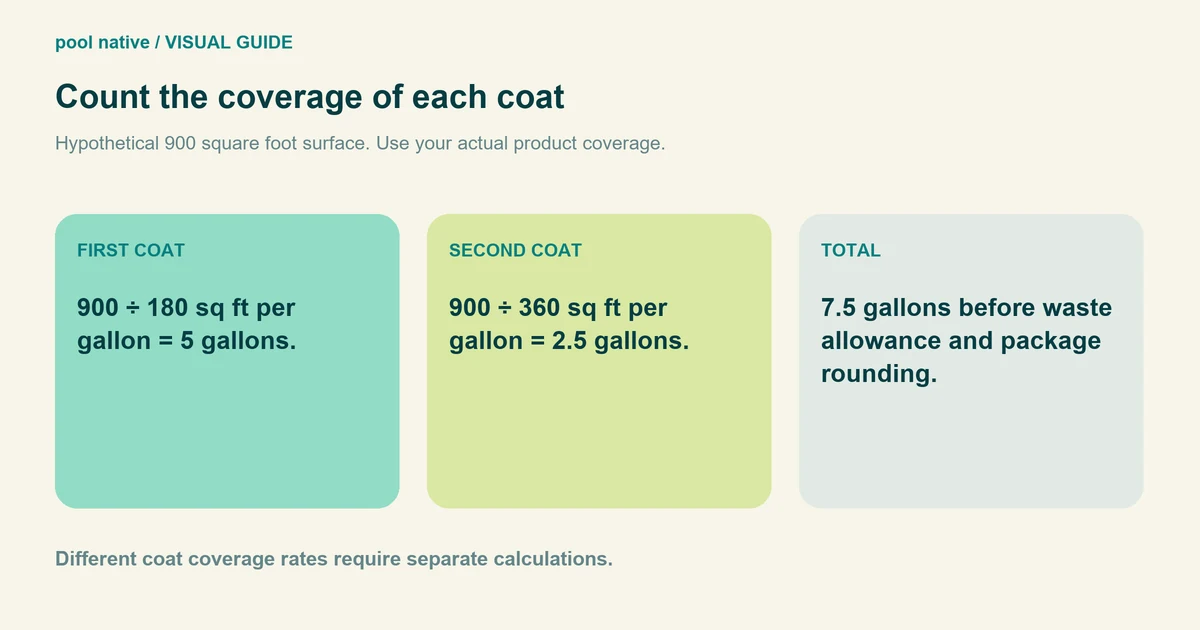
If that hypothetical package yields one mixed gallon, the purchase rounds to eight kits. If it yields two, it rounds to four kits. These numbers illustrate the method; they are not a product recommendation or coverage promise.
| Record | Your verified input |
|---|---|
| Paintable floor, walls, steps, and other areas | Total in one consistent area unit |
| Each coat’s coverage | The selected product’s rate for that surface |
| Mixed quantity for each coat | Area divided by its coverage rate |
| Package yield | Usable mixed coating per complete kit |
| Purchase quantity | Total mixed requirement divided by yield, rounded up |
Rough surfaces can consume differently from smooth recoats. Use the appropriate data sheet rate and discuss uncertain area or surface condition with technical support. Don’t stretch paint thinner to make a short order cover the pool.
Mix and apply according to the selected system
Use the stated component ratio and mixing procedure, including any induction period. Do not add extra hardener to accelerate curing or an unapproved thinner to extend working time. Split kits only if the manufacturer permits it and provides an accurate method.
Use the specified tools and film thickness. Follow the recoat window, including any preparation required after it expires. A heavier coat is not automatically more durable.
Record each batch’s mixing time, application area, and finish time. That makes an unexpected soft patch easier to investigate. Keep containers and labels until the project has been accepted.
Check cure readiness before refilling
Count from the final coat and apply the manufacturer’s conditions for the actual weather and ventilation. If rain interrupts curing, follow its specific instructions or obtain technical advice. Do not improvise a universal extra day rule.
If the film is soft, oily, blistered, or unexpectedly discolored, resolve the cause before filling. Early immersion, moisture, incompatible layers, poor mixing, and excessive thickness can produce different failures. Another coat is not a reliable diagnosis.
Once the coating and pool professionals confirm readiness, follow the approved refill and startup process. Keep chemistry within the finish and treatment requirements. Use the repair guide if the underlying surface, rather than the coating alone, remains in doubt.


